
What ceiling water damage repair means
A ceiling stain is a symptom, not a diagnosis. Water rarely enters a ceiling where the stain appears: it travels along joists, pipes, and drywall seams, then shows up at the lowest or weakest point. That is why a stain in a living room can come from a bathroom two rooms away, a supply line in the wall above, or a roof or window leak that runs down a framing channel.
Ceiling water damage repair therefore has three parts, in order: stop and fix the source above, dry the ceiling cavity and the materials inside it, and only then repair the visible ceiling. Skipping the middle step is the most common reason a repaired ceiling stains again. Wet insulation, damp joists, and moisture trapped behind drywall keep feeding the stain and can support mold growth in the dark cavity.
This page covers how the source is traced, how drying is checked, and when a ceiling section can dry in place versus when it needs to be opened and replaced. If water is actively dripping or the ceiling is sagging heavily, treat it as urgent and call (801) 555-0132 after moving belongings out of the way.
How the source above is traced
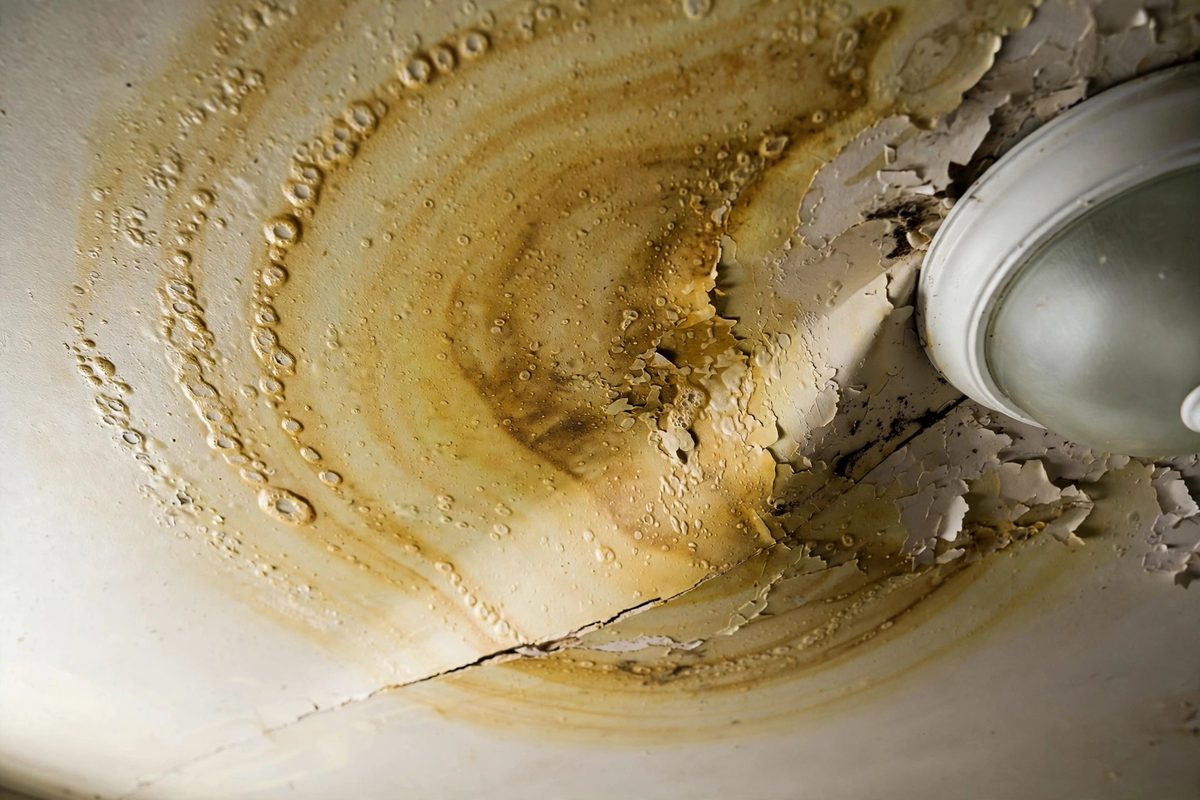
Tracing starts below, with the stain itself. The shape and edges of a stain carry clues: a round, ringed stain often follows a single slow drip, while a long, streaked stain suggests water running along a joist or pipe. Fresh paint bubbling and soft drywall point to active moisture; an old, dry, faded ring points to a past event that may already be resolved — but that still needs a moisture reading before anyone assumes it is dry.
Next, the room above is checked: bathrooms, laundry areas, and kitchens sitting over the stain are the usual suspects, along with the water heater, HVAC condensate lines, and any plumbing running through the ceiling cavity. Moisture meters are used on the ceiling and the floor above to map how far the wet area extends beyond the visible stain, because the wet footprint is almost always larger than the mark you can see.
Only after the wet map exists does the repair plan form. Sometimes the source is a single failed fitting or a supply line that can be addressed directly. Sometimes the ceiling itself must be opened in a controlled section to reach the source and to dry the cavity. Opening a ceiling is not done for its own sake: it is done when drying from below cannot be verified, or when the material is too saturated to save.
Warning signs — ceiling-specific
- Yellow-brown rings or blotches on the ceiling. The classic sign of a slow leak above, even when the surface feels dry to the touch.
- Paint bubbling, peeling, or blistering. Moisture pushing paint off the drywall means water is active or was recently active behind the surface.
- A soft or sagging spot. Drywall loses strength when saturated. A sag means the material is holding water weight and needs attention before it fails.
- Drips that appear after showers, laundry, or rain. Timing links the leak to a source: plumbing use points above, weather points at the roof or exterior.
- A musty smell in the room below. Odor without a visible stain can mean moisture trapped in the cavity, especially where the ceiling is closed on both sides.
- Cracks that follow a straight line. Water softens the joint compound along drywall seams, so cracks along a seam or screw line deserve a moisture check.
- Stains that return after repainting. A repainted stain that comes back proves the source or the moisture was never resolved.
- Warped or stained trim near the ceiling line. Crown molding and door casings wick moisture and show it before the ceiling field does.
Common causes in Herriman-area homes
In newer Herriman homes, the most common ceiling leaks come from the rooms above: a bathroom supply or drain line, a shower or tub surround that lets water past, a laundry connection, or a water heater or HVAC condensate line routed through the ceiling. Two-story layouts put living spaces directly under all of these, so a small failure upstairs becomes a ceiling problem downstairs quickly.
Roof and exterior paths matter too. Water entering around a vent, a flashing detail, or a window frame can travel inside framing for some distance before it stains a ceiling, which is why the stain and the entry point are often in different rooms. Seasonal freeze and thaw cycles can open small gaps at exterior joints, and summer storms can drive water into paths that stay dry the rest of the year.
Condensation is the quiet third cause. Cold water lines and poorly ventilated cavities can sweat in humid conditions, leaving stains that look like a leak but come from moisture in the air. A moisture reading separates condensation from a true leak, and the fix is different in each case — which is why guessing from the stain alone wastes repairs.
Safe first steps before anyone arrives
If the ceiling is sagging heavily or water is dripping steadily, keep people and belongings out from under it and call promptly. Do not press, poke, or cut a sagging ceiling yourself: saturated drywall can release a large volume of water at once, and the cavity may hold wiring or plumbing you cannot see.
- Move furniture, electronics, and rugs out of the drip path and place a bucket or towels below.
- Note when the drip appears: after showers, after laundry, during rain, or all the time. That timing is the most useful detail on the call.
- Photograph the stain, the sag, and the room above if you can do so safely.
- If you can safely reach the shutoff for the fixture above, closing it can slow a plumbing-fed leak while you wait.
- Do not repaint over the stain. Paint traps moisture and hides the wet footprint that diagnosis needs.
The visit step by step
- Confirm safety around the sagging area and check for electrical fixtures in the wet zone.
- Map moisture in the ceiling and the floor above to find the true wet footprint.
- Trace the source: fixture, supply or drain line, condensate path, or exterior entry.
- Stop the source where possible, or document what a separate trade needs to fix.
- Open the ceiling in a controlled section only if drying cannot be verified or material must be removed.
- Dry the cavity and surrounding materials, rechecking with moisture readings until they stabilize.
- Repair the ceiling surface: replace damaged drywall sections, finish, and prepare for paint.
- Recheck after drying so the repair is not closed over hidden moisture.
Cost factors (no prices listed)
| Factor | What it changes |
|---|---|
| Source location | A fitting reached from above differs from a leak buried in a closed cavity. |
| Ceiling material condition | Drywall that can dry in place differs from saturated sections that must be cut out. |
| Cavity access | An open attic or accessible floor above differs from a closed two-story cavity. |
| Drying extent | A small stain footprint differs from moisture spread across several joist bays. |
| Finish work | Texture matching and repainting scope depends on how much surface was opened. |
| Related damage | Insulation, flooring below, and trim in the drip path may need attention too. |
We do not publish dollar amounts. Confirm scope on the call at (801) 555-0132.
When a ceiling leak is an emergency
Fast dripping, a ceiling that sags visibly or feels soft across a wide area, water near light fixtures or ceiling fans, and any sign of the ceiling bowing downward all justify an urgent call. Move out from under the area, avoid the room if water is near electrics, and call (801) 555-0132. Details on rapid removal live on the emergency water extraction page.
FAQ — Ceiling Water Damage Repair
Why does my ceiling stain keep coming back after painting?
Because paint covers the symptom, not the moisture. If the source above is still active, or the cavity was never dried, water keeps feeding the same spot and the stain returns through the new paint.
Can a ceiling dry on its own if the leak stops?
Sometimes a small, brief wetting dries without help, but a closed ceiling cavity dries slowly and unevenly. A moisture reading is the only reliable way to know whether the cavity is dry or still holding water.
Do you always have to cut the ceiling open?
No. If moisture readings show a limited, drying footprint and the drywall is still firm, drying in place may be enough. Cutting is used when drying cannot be verified or the material is too damaged to save.
How do I know if the leak is plumbing or the roof?
Timing is the best clue: leaks tied to showers, laundry, or fixture use point to plumbing, while leaks tied to rain point to the roof or exterior. Moisture mapping confirms which path the water took.
Is a sagging ceiling dangerous?
It can be. Saturated drywall is heavy and can fail without warning, and water near fixtures adds electrical risk. Keep clear of a sagging area and call promptly rather than testing it by hand.
What should I have ready when I call?
Where the stain is, when water appears, what sits in the room above, whether the ceiling sags or drips, and your Herriman-area ZIP. Photos of the stain and the room above help triage.
Related services
Continue with Emergency Water Extraction, Water Damaged Drywall Repair, Mold Inspection, Mold Remediation. Return to water damage repair in Herriman for the full overview.
Herriman notes for ceiling water damage repair
For ceiling water damage repair in Herriman, UT, start with the room above, not the stain. Two-story homes put bathrooms, laundry, and water heaters directly over living spaces, so the source is usually one floor up — and the stain is usually not directly below it. Note the timing first: plumbing-use timing and rain timing point at different sources, and that single detail saves a misdirected repair.
Newer construction does not prevent ceiling leaks; it changes where they hide. PEX and modern fittings fail less often at joints, but appliance hoses, shower surrounds, and condensate lines still feed ceilings, and closed cavities in newer homes dry more slowly because there is less airflow. If a stain appears after a long shower or a laundry cycle, check the fixture above before assuming the roof.
When comparing options, weigh drying verification against speed of repair. A ceiling closed up while still damp will stain again and can support mold growth in the cavity, so a repair that includes moisture readings is worth more than a fast patch. Document the stain with photos before any work, and call (801) 555-0132 to start ceiling water damage repair in Herriman, UT.